Monday, December 11, 2006

Chocolate

The holidays are really all about gluttony for some of us, but I actually prefer the cooking part to the eating part, strange as that may seem. Not that my food isn't good - I'll admit it's terribly good sometimes - but eating is a short-lived experience, and cooking is a slow process that adds layers of flavor one on top of another, each adding another smell to the kitchen. And the really nice thing about the holidays is that, since everyone enjoys eating so much, I get to cook more.

I think I only really make chocolate tortes and cheesecakes and dense desserts around this time of year, as my family of four would barely make a dent in them. They're great for a crowd, and this chocolate torte recipe is especially great for a crowd that likes a really deep chocolate flavor. It starts with a ganache, which is highly versatile, and builds from there. But before I get to the torte recipe, I need to discuss a few things.

First, dark chocolate (the kind to use in baking) comes in all different flavors and levels of quality, and what chocolate you use in something with mostly just chocolate in it will make your dessert what it is, or what it should have been. This is not a time to sacrifice quality, it's a time to sacrifice whatever nice meal you were planning on later in the week to purchase the best you can get. My favorite chocolate to bake with is no longer something readily available: the Ghirardelli 10-lb. blocks of dark chocolate that I used to find broken into large chunks in the bulk section of my grocery store no longer exist. They actually aren't even made on a regular basis.
I know, because I called Ghirardelli and talked to 20 people trying to find some. If you can get their Queen Anne dark chocolate melting wafers, you are a lucky person, but it's not likely. Sometimes you can still find chunks of their dark chocolate blocks, as I did recently at World Market, around the holidays. Beyond that, I don't have great recommendations. Ghirardelli's bittersweet chocolate chips will probably work pretty well, also. You can find those at most grocery stores, or a huge 3-lb. bag at World Market as well. (Very handy for keeping around the house.) Oh, and I really like the Lindt 70% cocoa bars, available only in 4 oz. bars. I've toured a lot of brands of chocolate, and I have to say it's all about personal taste. Ghirardelli and Lindt have a very smooth flavor that I like. I think Callebaut also has that same quality. Valrhona has a very sharp chocolate flavor, perhaps with a deeper roast to it. Nestle has a new 62% cocoa Chocolatier baking bar out, sold in 8 oz. bars, that I didn't like, as it didn't melt well and the chocolate wasn't outstanding, but it would do in a pinch, unless it's for drinking.

So, to begin, you need to know how to make chocolate ganache. A basic ganache is very simple: take 8 oz. of a chocolate that you like and chop it up. If it's a large chunk, chop it up with a
serrated knife, as that works best. Then, separately, bring 8 oz. (1 cup) of heavy cream just barely to a simmer and pour it over the chocolate. Stir the two together until the chocolate is melted and consistently smooth. At this point, you better taste a spoonful, just to know how good it is.

A ganache like this can be used as a sauce for decadent desserts or a base for hot chocolate. My favorite drinking chocolate recipe is as follows: 1 c. milk, 1/3 c. firm ganache (3 parts chocolate to 2 parts cream), and 1 1/2 T. cocoa. Heat the milk until quite hot, whisk in the cocoa until melted, then stir in the ganache until consisted. The ganache can also be used for desserts, one of which is a Chocolate Hazelnut Torte. We should get to that point now.

But, before we do, I have one more point to make. I am a happy baker because I have the perfect cake pans. Some like their regular cake pans, some like their springform pans, but I have the best pans of all. They're my 9"x3" cake pans with removable bottoms. They're more expensive than regular cake pans, but if you get them, you will be as happy as I am every time I use them...
I get giddy just thinking about it. If you don't have them, you have no idea how extraordinarily useful they are. I always line the bottom and sides of my pans with parchment paper (yes, I do measure and cut that out), and then when my cake is slightly cooled, I set the whole pan on a drinking glass and it slides right out of the pan, along with the bottom. Then I can easily remove the bottom from the cake by turning it upside down or sliding a knife or spatula along the bottom if necessary (to slide it onto a serving tray). It can be cooled on the removable bottom, even served on it. It can also be cooled completely on it, then reinserted into the main pan and thrown safely into the freezer. I also have the 6"x3" pans, which is the perfect size for half a recipe. They come in 2" tall versions as well, but don't go there. If you make a cheesecake or torte, you'll be a wee bit shy of enough room for a large recipe.

Okay, on to the chocolate torte:

Chocolate Torte

12 oz. bittersweet chocolate
12 oz. heavy cream
5 T. sugar
1 t. vanilla
5 eggs, separated
1 c. whole hazelnuts

First, roast the hazelnuts in a 350
° oven for 12-15 minutes, until fragrant and the skins are peeling back. Remove them and cool slightly. Reduce the oven temperature to 325°.To remove the skins, take a handful and rub it back and forth between your two hands until the nuts are mostly cleaned. Place them in a food processor with 2 T. of sugar and process until finely ground. If you do this too long when they're warm, you'll end up with hazelnut butter, so be careful of that.

Reduce the oven temperature to 325°. Prepare your 9"x3" or 10"x2" cake pan or springform pan by spraying the pan with cooking spray, then lining the bottom and sides with parchment paper. (No need to spray the paper.)

Make the ganache: chop the chocolate up, heat the cream, pour the cream over the chocolate, and stir until smooth. Let this cool a bit before continuing.

Mix the vanilla, and egg yolks into the ganache. Separately, whisk the egg whites with the remaining 3 T. sugar to medium peaks, then fold the whites into the ganache in 3 batches. Being careful not to stir too long. Stir in 2/3 cup of ground hazelnuts.

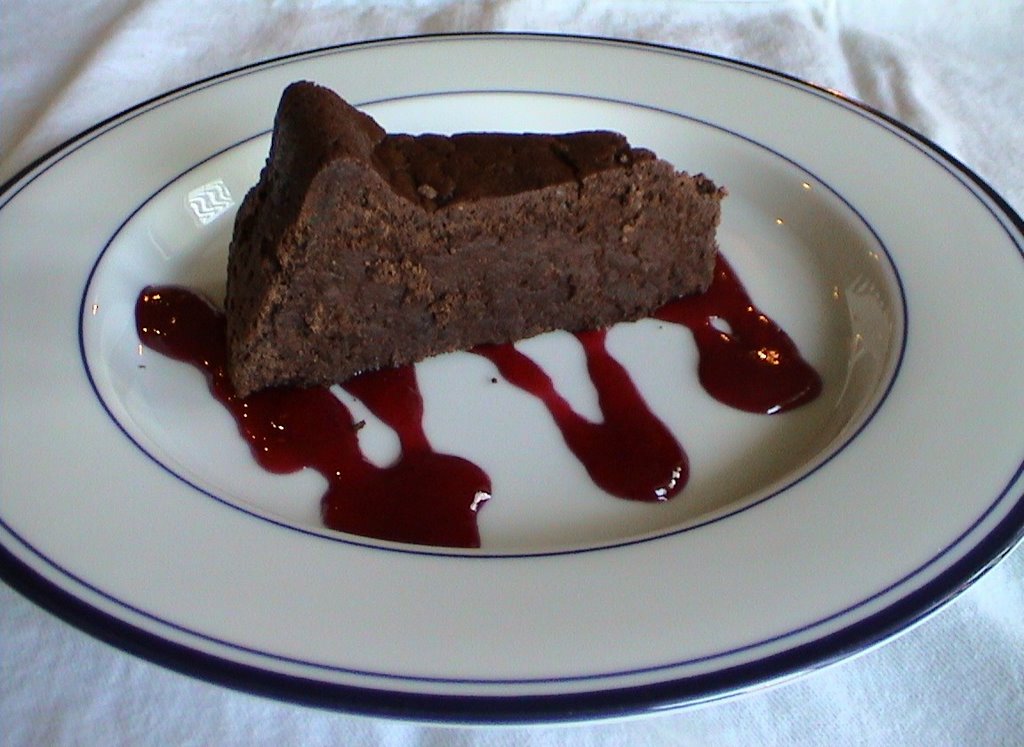
Pour the batter into your prepared pan and bake for 50 minutes, until the cake is well-set. Remove to a cooling rack and cool 5 minutes, then remove the sides of the pan if you're using a springform or removable bottom pan. Cool completely, then chill. This torte is great prepared 1-2 days in advance at least, as the flavors will have more time tow meld. Serve with whipped cream or raspberry sauce.


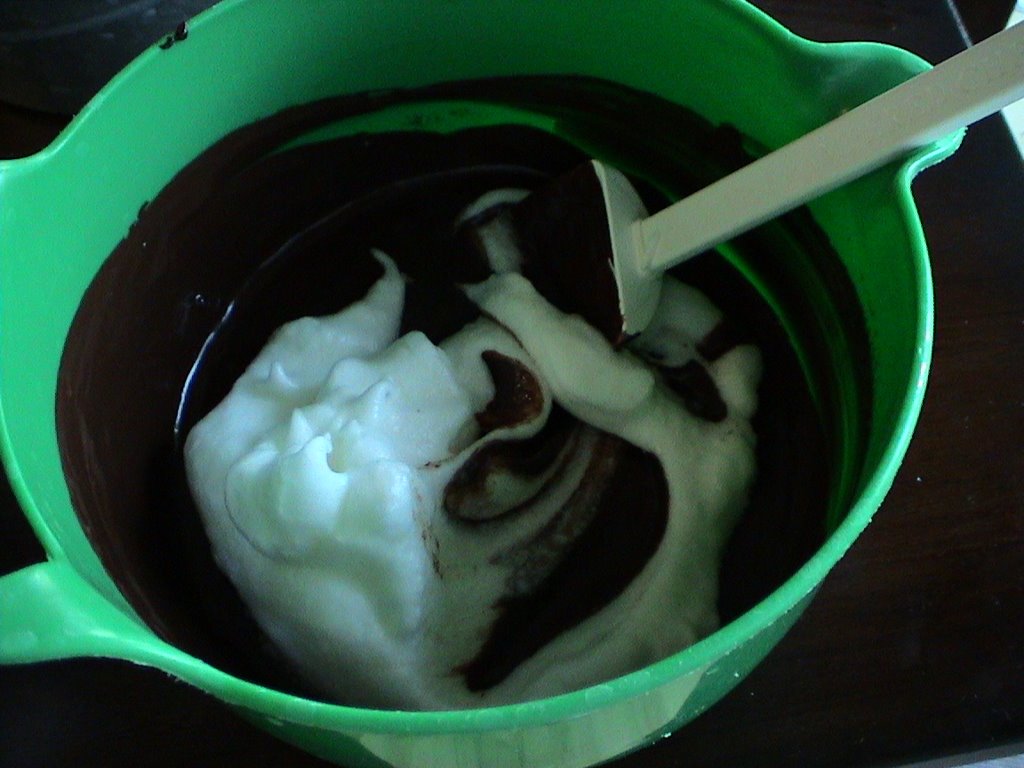
At this point, I've mixed in part of the egg whites and I'm adding more to them.


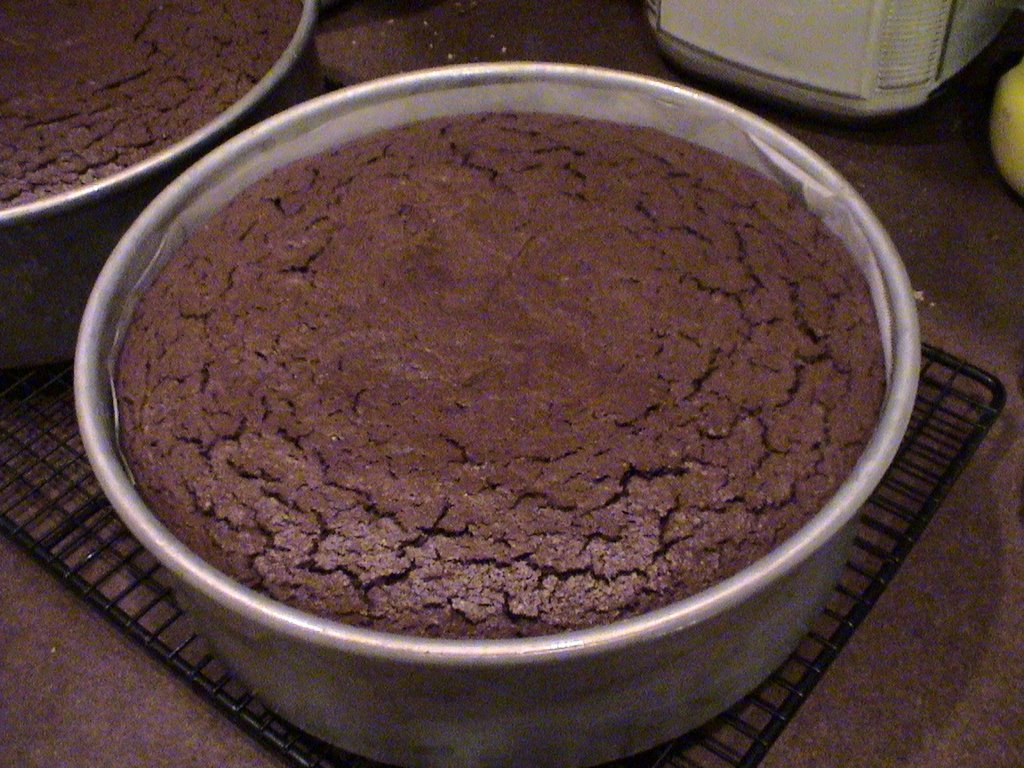
This is what the torte looks like upon removing it from the oven: a little crackly but no longer jiggly.
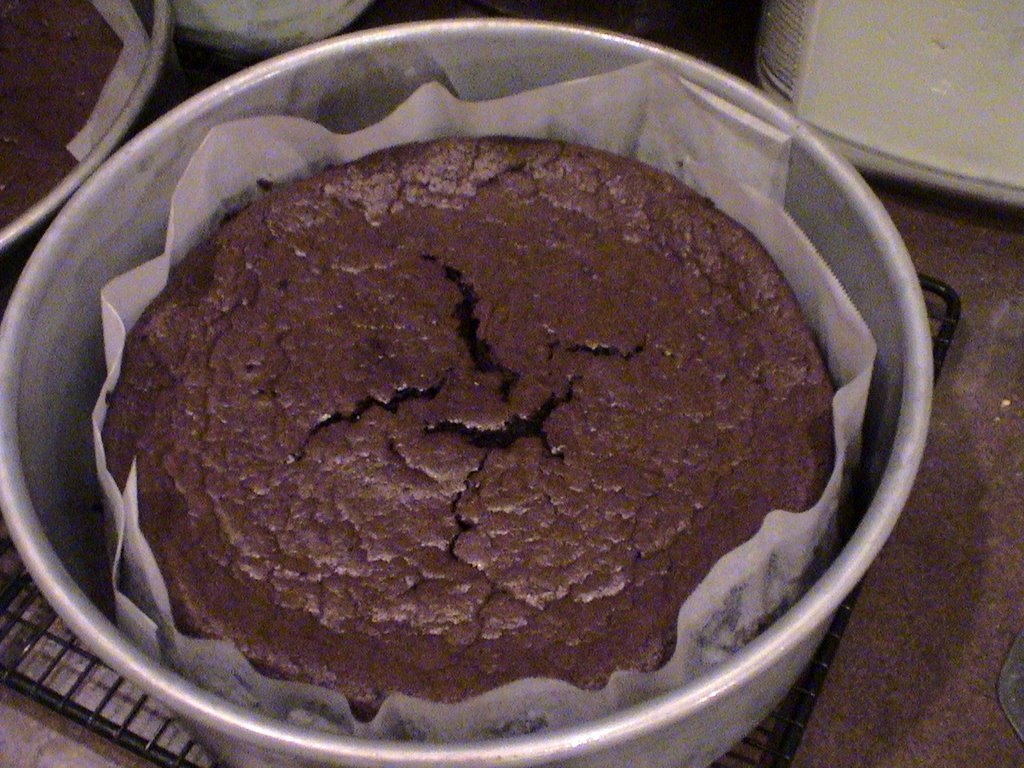


Af
ter several minutes, you'll see a large crack in the middle. Don't be shocked. The cake is very much like a souffle, so this is to be expected and won't detract from the texture at all.


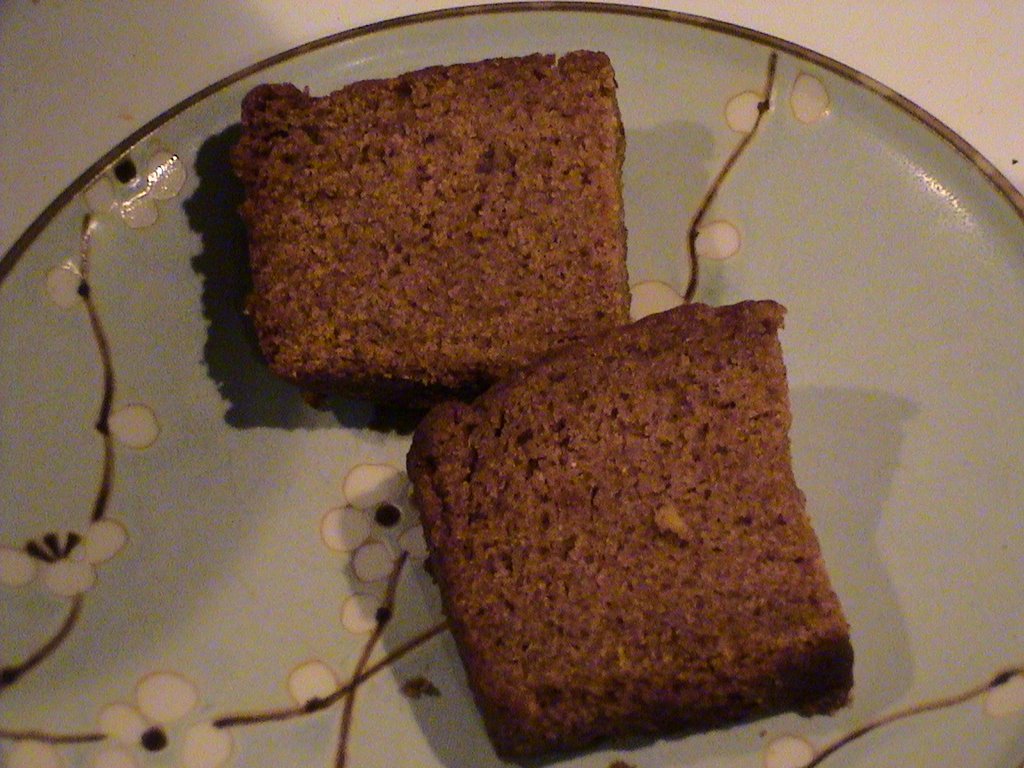
I made two chocolate tortes, along with two cheesecakes, for my guests last week. I had prepared the desserts early in the week and frozen them, then set them on my chest freezer to thaw, thinking the easiest way to slice them would be when they're partially frozen. Unfortunately, I left the garage door open, and a stray dog made his way into my garage, pulled one 
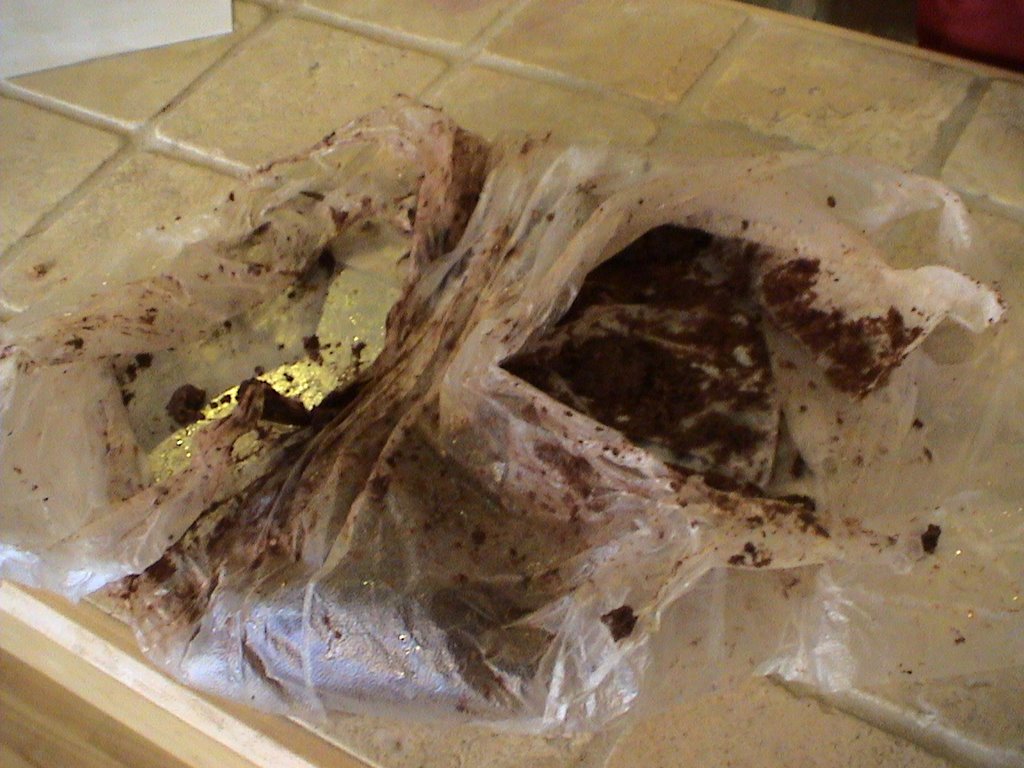
of these well-wrapped tortes off the top of the freezer, dragged it into the front yard, and only stopped licking his plate when I came outside to find this. In case you can't tell from the picture, there's nothing left. The dog didn't belong to any of my neighbors and had a collar on but no tags, so I couldn't contact his owner to let them know of the impending sickness that would overcome a dog that eats 12 oz. of dark chocolate. Eventually, the poor thing wandered off, leaving me crestfallen over my dessert, and wondering what the dog's fate will be.

Tuesday, November 21, 2006

Thanksgiving Dinner

Let's be honest. Thanksgiving is about the warmth of being around family, taking time out for one another, and showing gratitude for our bounteous blessings, but - most of all - Thanksgiving is about a nice big dinner. We all love to eat, and for those of us who love to cook, Thanksgiving is paradise. That's me. I love to cook. This week is so exciting for me, with lots of family coming and tons of food to organize and prepare, that I can barely sleep. The last few mornings I've been waking up too early with that feeling inside like I got when I was little and it was Christmas day.

But enough about my giddiness, we have more important things to discuss, like what we're actually eating. As you can see, the refrigerator is stuffed and ready for the week. (Good thing I cleaned it last Wednesday!) So here's the menu:


Warm Pear and Pecan Salad
This may be my favorite part of the meal. I got this recipe, which I've since altered as usual, from a weekly email from The Splendid Table, which I highly recommend. In the original email, Lynne Rossetto Kasper mentioned the salad was good enough to have as a main course. I have to agree. The pears are warm, the pecans are slightly sweet and toasty, the bleu cheese (I only use Maytag) balances the flavors so well, and the cranberry vinaigrette adds just the right amount of tartness to bring it all together. It's a splendid salad, and here's the recipe:

Vinaigrette:
2 1/2 T. raspberry vinegar or red wine vinegar
1 t. - 1 T. sugar, depending on the sweetness of the vinegar
1/2 t. orange zest (microplane works best)
salt, freshly ground pepper
1/4 c. olive oil
3 T. dried, sweetened cranberries, coarsely chopped

Salad:
1 large pear, cored, sliced into 8-12 wedges
1 1/2 t. olive oil
1 1/2 t. butter
salt, freshly ground pepper
1/3 c. pecan halves, slightly chopped
green leaf lettuce
1/4 c. crumbled bleu cheese

For the vinaigrette, mix the vinegar, sugar, zest, salt, and pepper in a small bowl. Whisk in the olive oil, then stir in the cranberries. Set aside; refrigerate after a couple of hours if not using the same day. (Note: I like to make this a couple of days ahead of time to let the cranberries release their flavor and soak up some of the dressing.)

For the salad, heat the oil and butter in a skillet over medium heat. Cook the pear wedges until golden brown and just tender, about 4 minutes per side. Add salt and pepper to the second side only during cooking. Remove pears to a dish. Reduce heat to medium low and add the pecans. Cook, stirring, until lightly toasted and warm. Remove from heat.

To plate, divide the lettuce among 4-6 plates. Arrange the pears over each plate, then sprinkle with nuts and bleu cheese. Just before serving, drizzle the vinaigrette over each salad.


Roast Turkey
Well, here's a shocker. We're having turkey. I bought a "fresh" turkey this year from the grocery store, which means the turkey arrives at the store at 33°, ever so slightly frozen, as opposed to the 10° turkey from the freezer. I had purchased a fresh turkey a month ago to use for stock after roasting, and the meat was very tender, moreso than I remember from previous frozen turkeys. Additionally, I like to brine my bird, so Wednesday afternoon, I put it in a solution I got from Emeril Lagasse, as follow: 1 1/2 c. Kosher salt, 1 1/2 c. brown sugar (organic is nice here), 3 quartered oranges, 3 quartered lemons or limes, lots of fresh thyme, and lots of fresh rosemary. I microwave all of that in a large bowl with some water until the sugar and salt dissolve completely, then I toss it into a 5-gallon bucket with plenty of ice and water to make 3 gallons. (If the salt isn't completely dissolved, you end up with a salty spot on your turkey, which is very unappetizing.) Then I add my 20-lb. turkey and leave it alone, except to turn it once during the next 18-ish hours and check it periodically to see if it needs more ice, since it's not cold enough in my garage to be a refrigerator.

Thursday, I take it out, rinse it, and stuff the inside with the oranges, limes (squeeze the fruits out before tossing them in), and herbs while roasting. Actually, I don't think I'm going to put the citrus fruits in this time, since it can make the drippings sweeter and fruitier than I'm looking for. I love the flavor this brine adds to the turkey. It may sound bright, but it ends up being more like citrus and herb overtones than a distinct flavor, and the meat stays juicier longer, even after a couple of days in the fridge.

Oh, and one last thing. Don't use the pop-up timer!!! Your turkey will be overbaked everytime. The dark meat needs to reach 185° and the breast needs to get to 165°, a few degrees of which will be obtained during the 30-minute resting period after removing the turkey from the oven, before carving. I'm not sure what temperature pop-up timers are looking for, but enough not to get sued. Use a nice meat thermometer inserted into both places; digital probes work well. And you can cover your breast meat with aluminum foil partway through roasting to keep it from drying out if it has to stay in longer to allow the dark meat to cook thoroughly.

Stuffing
Since I put the aromatics in the bird, you probably realize I'm not adding the stuffing. We are still having it, though, but baked in a dish. This is for one big reason: it changes how long the turkey has to bake, and sometimes means you have to overbake the turkey to bring the stuffing to 185
°, which is the temperature I'm aiming for, since I add egg to keep it somewhat cohesive.

That aside, I'm using good white bread (not the sandwich kind, the "French bread" type, but not the local grocery store's $1 kind), apples, bacon, and the usual stuffing ingredients. One of my friends, Elizabeth said she really likes leeks in stuffing, which sounds delicious, but I don't think I'm going to the grocery store again before Thanksgiving. If plans change, I may grab some. Anyhow, we tested the stuffing for flavor a couple of weeks ago to see if we liked both the apples and bacon, and we're keeping with it. I can't wait to have it again!

Mashed Potatoes
We're not having these.

Pilaf
Mark is part Armenian, and we always have pilaf at Thanksgiving. This may seem like heresy to some of you mashed potatoes and gravy fans, but then you probably haven't had good pilaf. It's the perfect use for turkey drippings, and I have some frozen turkey and chicken stock on hand to fill the gap. Pilaf is really pretty easy: brown 1 c. orzo pasta in 2-3 T. butter until a deep, dark brown, then stir in 2 c. long grain rice, then 6 c. broth. Taste for salt and pepper, bring to a boil, stirring, then cover and simmer 20 minutes. Remove from the heat and leave it alone, covered, 5 minutes. Turn it out to fluff and serve. We'll be making 2 1/2 times this amount, so I've done a lot of stock-making over the last month or so. It's important with pilaf to have a full-flavored stock, so I always roast my chicken or turkey before making it and make sure it doesn't have a diluted flavor before storing it.

Whipped Sweet Potatoes
These are pretty simple: bake the sweet potatoes, mix with butter, salt, fresh nutmeg, and just a touch of cinnamon.

Cranberries
I know I just made cranberries with apples a few weeks ago, but I've decided to go my traditional orange zest, orange juice, and cinnamon stick method this time. The other cranberries are very good, but I like the bright flavors of this other recipe to counter all the starch at Thanksgiving.

Creamed Onion
I love my mom's creamed onions, even if they too indulgent to have any other time of year. If you've never had them, this is definitely one to try. When they come out of the oven, though, they are steamy hot, so don't burn your mouth. And if you can't find boiler onions (they're hard to find), you can buy small white onions and quarter them.

2 dozen small white onions (boiler onions)
1/4 c. butter
1/4 c. flour
1 1/2 c. cream
salt and pepper
dash of cayenne
1/2 c. torn buttered bread

Boil onions five minutes. Drain, reserving 1/2 c. liquid. Melt butter and blend in flour. Gradually add reserved liquid or other water and cream, stirring constantly. Cook, stirring, until smooth and thickened. Add salt, pepper, and cayenne to taste. Add onions and mix lightly. Pour into 8" square dish and cover with foil. Bake at 350° for 45 minutes; uncover, add bread, and bake about 15 more minutes.


Green Bean Casserole
I'm using Martha Stewart's recipe for the green beans this year, almost. I can never just follow a recipe, since I'm so curious about everything. I didn't add the red bell pepper, I used crimini mushrooms (or a mix of crimini and white), I double-dipped my shallots before deep frying (it makes a significantly better coating), and I omitted the bread crumbs. I did like the parmesan cheese. I also just mixed the mushroom sauce and the prepared green beans (haricot verts) all together and tossed them into the dish before topping them with the cheese and shallots. The trial run a couple of weeks ago was very good, and I recommend this variation if you like the traditional flavors of green bean casserole. I plan on making the mushroom sauce tomorrow to help reduce my Thursday chaos.

Corn Pudding
My grandma used to make scalloped corn frequently for Thanksgiving, or just Sunday dinner, when I was little, and I always loved it. Maybe because I'm from the Midwest and thus a big corn fan. In any case, I really wanted to carry on the tradition this year, so I'm attempting to make something I've never tested out before, but I'm hoping it will be good. I'll keep you updated.

Pie
Ah, pie, the love of my kitchen life. I'm making 2 pecans, 1 pumpkin, 1 apple, 1 peach, and 1 cherry. And, of course, lots of lightly sweetened whipped cream. I could go on about pie for a while, so I'll have to save that for another blog, hopefully soon. We should have enough for our 12 adults, 5 kids, and baby, and enough for leftovers. Leftover pie is important, too.


So there you have it, and I'm exhausted just writing it all down, so I know it will wear me out to make it, but I wouldn't have it any other way. I can't wait to get started. Hopefully the men will clean up when we're done, and then we can just relax. And turn on the NFL network. And have another piece of pie.

Saturday, November 11, 2006

Pesto, Pumpkin Bread, Etc.

Unfortunately for the blog world, I don't have enough minutes in my day to post everything I eat. I'm sure everyone would find it terribly interesting, since I try to only ever eat things that sound positively delicious at the moment: a Lindor truffle ball, some homemade soup, or Wheat Thins with sliced cheddar. Maybe that doesn't sound terribly exciting to you, but then again maybe you don't enjoy food as much as I do.

So, in the past two weeks, I've made (at least) a few noteworthy foods, and I'm just going to quickly mention them and throw down the recipes for reference. Don't be misguided by my short blog, though, if this turns out to be short. You definitely need to try these.


First, I made fresh halibut on the grill with this wonderful tomato cream sauce...definitely the best I've ever done, and it wasn't even my recipe. It was Emeril's. Shocking, I know. I used my garden tomatoes, Brandywines (the last of the season, which finished ripening in the house). I'm sure that helped, but I think the recipe was very well done. You can find it here. Well, it's a recipe for more than the sauce, but the sauce is what I made. Except I used chicken broth instead of fish stock. And I didn't add the tomato paste or parsley. And I probably threw in more thyme than it called for, since my garden has produced abundant amounts of thyme. So delicious!

Next, I made pesto with the last of my basil before we had a hard frost. My brother Dan had sent an email out to the family about his pesto recipe, which was strikingly similar to mine, with a couple of exceptions, so it got me thinking along pesto lines, and I quickly (because pesto is very fast to make) threw together a batch. My favorite way of eating pesto, by the way, is on roasted, cubed red potatoes. You'll need to add a little extra olive oil and perhaps salt to the potatoes along with the pesto, but I personally find it way better than on any pasta. Following is my recipe, but I should preface it by saying Dan's called for half the pine nuts and 2/3 the cheese, but I like the pine nuts and cheese, even if it dispells the basil a bit. His also calls for twice the garlic, which I only recomment if you've got tiny cloves of garlic or like a really strong bite, as it doesn't get cooked and will hit you pretty fast. Sometimes I do like mine that way, but usually I like a more subtle blend.


Pesto

2 cups basil leaves, washed and dried
1/2 c. toasted pine nuts (toast in a dry skillet over low, they burn very easily)
pinch or so of Kosher salt, to taste
2 cloves garlic
3/4 c. grated fresh parmigiano reggiano
about 1/2 c. olive oil

Blend the first four ingredients in a food processor, then quickly blend in the cheese. With the processor running, slowly add the olive oil to desired consistency, no more than 1/2 cup.

Don't forget to try it with potatoes!


And I finally reached my 4-year goal of finding a pumpkin bread recipe that I really like. I wanted something a little creamy, reminiscent of the smooth custard feel you get when you eat a pumpkin pie, not so much like zucchini bread that feels dried out after a day. When I was little, we used to spread butter or cream cheese on our zucchini bread or pumpkin bread - I wanted a bread that didn't need that and preferred to be left toppingless. My 7-year old Emily and I at last achieved that just yesterday. The recipe makes two loaves. I froze one, and this is all that was left of the other for a measly, low-light picture. Since I took the picture 20 minutes ago, even less is left. So here it is, a combination of recipes, of course, so it's mine now:


Pumpkin Bread

1 c. unsalted butter, room temperature
3 c. white sugar
4 large eggs
2 c. pumpkin (canned works great)
1 t. vanilla
2/3 c. cream (oh, come on! that's 1/3 c. per loaf, and how much of that are you eating?)
3 c. all-purpose flour
1/2 t. baking powder
2 t. baking soda
1 1/2 t. salt
1 t. freshly grated nutmeg
1 T. cinnamon

Preheat the oven to 350˚. Spray two 9" x 5" loaf pans with cooking spray and set aside.

In a stand mixer, cream together the butter and sugar, about 2 minutes, then add the eggs, one at a time, until thoroughly combined. Mix in the vanilla.

In a medium bowl, whisk together the flour, baking powder, baking soda, salt, nutmeg, and cinnamon. Separately, stir together the pumpkin and cream. Slowly add the flour mixture to the pumpkin batter in 3 additions, adding half the pumpkin and cream between each addition and scraping down the sides as needed.

Divide the batter between the two loaf pans and bake 60-70 minutes, until a tester inserted in the middle comes out fairly clean, or at least without really moist crumbs attached to it. Cool in the pans on a wire rack for 10 minutes, then turn out of pans and cool completely (or at least another 20 minutes) before slicing. Wrap any leftovers tightly to keep moist.

You better try this one while it's still the season for pumpkin. Of course, once you have it, you'll be making it throughout the winter.

I better go finish off that last piece.


Tuesday, October 24, 2006

Best Meal of the Day

Mark is funny. He goes through phases with his breakfast item-of-choice, and often uses one option day after day until he's sick to death of eating it. Then he'll want the next item on his list until he's worn that one out. He's been asking me for a few days to make him granola, which I periodically do, and he finally mentioned yesterday that he doesn't really like breakfast anymore - a sign that he definitely needed a change of pace. I got to work.

My granola recipe originally started from one I got out of a Williams-Sonoma catalog. I used to snip their recipes and try the ones that didn't involve specialty items you could only buy from them. As with all my recipes, it evolved over time until I found just what I like. I love the simple, sweet flavors in the honey and butter and the depth from the roasted almonds. You can roast the almonds by baking them in a single layer in a 350° oven for 8-10 minutes, until they're fragrant. They'll toast a bit more during the recipe, so don't overbake them.

Granola

4 c. old-fashioned rolled oats
1/2 t. salt
1 t. cinnamon
3/4 c. roughly chopped, toasted almonds
1/2 c. (1 stick) unsalted butter
3/4 c. dried sweetened cranberries
1/2 c. brown sugar
1/2 c. honey
3 T. orange juice

Preheat the oven to 325°. Coat a large baking sheet with non-stick spray or a silicone mat to prevent sticking, then set aside.

Stir together the oats, salt, cinnamon, and almonds in a large bowl. In a medium microwave-safe dish, combine the remaining ingredients and melt on high for 1-2 minutes, until the butter is completely melted. Stir until the mixture is consistent, then add to the oats. Stir everything together to coat the oats and almonds evenly, then spread across the baking sheet.

Bake for 35-50 minutes, depending on your oven and how toasted you like your granola to be (45 minutes is just about right for me), stirring a couple of times during the last 15 minutes of baking. Cool to room temperature. Store in an airtight container for up to two weeks. Serve with milk or yogurt and fruit.

Thursday, October 12, 2006

Mmmm, Mmmm, Cranberries


I love cranberries. I look forward to them every year, patiently anticipating them throughout the bountiful summer months, and as soon as I see them in the stores, I hold myself back so I don't buy 3 bags while it's still too warm outside for my family to appreciate them. Not that I've ever discussed it with them, but if I contain my excitement for a few weeks until the chill sets in (at least a bit), then I can make cranberries last that much longer into the winter.

Speaking of family, cranberries were not just a decoration at our family Thanksgiving table. I think lots of people grab "that can" just because it's supposed to be there, and someone at your dinner party might like to taste a little with the turkey. When I was growing up, we all ate the cranberries, my dad taking an extra quart of Grandma's homemade relish with him every time we left my Grandma's Thanksgiving dinner, and we were served both this relish and the canned jelly variety. The canned cranberries always made me giggle a little, since it was the only time of year I'd see a jelly molded into the form of a rippled can. (Actually, it was the only time of year I'd see a jelly mold at all.) And we didn't disturb the perfect form; it was plated perfectly on its side, smooth and sleek (except for bumps from the mold), and stayed that way until dinner started, unless we sliced it neatly. The homemade cranberries, on the other hand, were not given such homage. They were poked and tasted frequently before the meal was underway.

When, at last, I can restrain myself no longer and purchase that first bag of cranberries, I inevitably do the same thing with it: cranberry orange muffins. Those hit the spot. Sweet muffin, orange essence, and the bright punch of a cranberry. If you haven't made them, you should. Often. I used to use Martha Stewart's recipe from her cookbook The Martha Stewart Cookbook (made in regular muffin tins rather than hors d'oeuvres-size), but this year I tried the variation found in The Best Recipe. Both are good for different reasons: Martha's is a very delicate and traditional muffin with a lovely texture, while The Best Recipe's is very much like a cake. I think I prefer Martha's version, but I'm always willing to try something new.
After making the muffins, I'm left with half a bag of cranberries, the perfect amount to use for a new cranberry sauce recipe. For dinner Monday, we had pork tenderloin I'd browned with salt, pepper, and Dijon mustard, then sliced into medallions and seared to finish. It went perfectly with my new cranberry sauce. Here's the recipe:

Apple Cranberry Sauce

1/2 c. sugar
1/3 c. brown sugar
1/2 c. water
6 oz. fresh cranberries
2 small Granny Smith apples, peeled and diced
1 small Gala apple, peeled and diced
2 slices orange peel

Combine all ingredients in a medium saucepan. Cook, stirring, over medium-high heat until most of the cranberries have popped and the apples begin to soften, 7-10 minutes. Cool to room temperature before serving, or refrigerate to cool completely.


Friday, October 06, 2006

One-Day Bread with Flavor

My interest in making my own bread (beyond the regular sandwich type) really started after we'd been away from Ann Arbor, Michigan (and Zingerman's) for nearly a year, and I was growing painfully aware other breads in the area weren't going to satisfy my need for European-style loaves. Not that I've even been to Europe, mind you, but I've tasted bread enough to know what a good loaf is supposed to be. So, my appetite was piqued, and I started researching. There are several places on the web to get started, my main resource for a time being The Artisan, a great place to grab some recipes and get started, followed by the extraordinarily educational videos of Julia Child with Nancy Silverton and Danielle Forestier. The Julia Child site was probably where I learned the most about technique. I also checked a couple of books out of the library, learning by gathering bits and pieces of information all over the place.

A few qualities were essential to me in achieving the bread I longed for: a well-defined crust, a good crumb, and a developed flavor usually unattainable in one day. For the flavor, a sourdough does the job nicely, but I prefer the 2-3 day versions of developing flavor, though it takes some practice to do it well. The crumb takes a good amount of kneading (thank you to my large KitchenAid mixer) and the right amount of rising, which should continue in the oven. For this to happen, I always place a large cast-iron skillet on the bottom rack of my oven at least 10 minutes prior to baking, then I pour 1-2 cups of water in it just after adding my loaves to the oven. This keeps the dough from forming a crust early on in baking, allowing it to rise for a longer period in the oven - you know that last little amount that you can't let happen on the counter or it falls when you move it. The humidity also helps the bread to form a good strong crust toward the end of baking.

My other trick is to always bake bread on a stone, something nice and thick, at least an inch or so, allowing it to preheat in the oven 45 minutes before baking, so it's completely to temperature. In case you're wondering, that handy round baking stone you bought at Target or Pampered Chef is way too meager for this task. It will do if you're stubborn, but if you're just cheap like me, then go to your local all-purpose home store and grab a couple of Saltillo tiles, Mexican terra cotta unglazed tiles, for under $2 each. Then, if they break because you poured water on them while they were hot, you won't get all worked up. But I always bake on parchment paper, as the tiles are not food-grade.

So, the point of this whole exposition is to announce that I have a recipe I like that only takes ONE day to make. Granted, it takes the whole day, but I can start it around 9 am and have it with dinner, which doesn't require too much planning ahead. I was greatly helped in coming up with this by Joan Nathan's The New American Cooking, a book I really enjoy but have not used enough of yet to give you a definitive review. This is my version of the bread:

French Bread
I know, exciting title.

1 t. active dry yeast
1 t. sugar
3 c. warm water
about 7 c. bread flour
2 t. Kosher salt
olive oil, for brushing

Dissolve 1/2 t. yeast and 1 t. sugar in 1 1/2 c. water, then stir in 1 cup of flour until fairly smooth. Cover tightly with plastic wrap and let rise for 3 hours.
Stir the remaining water and yeast into the sponge, then add 5 1/2 c. flour, 1 t. salt, and all the sponge to the bowl of a standing mixer. With the dough hook in, knead the bread for 10-15 minutes, adding a bit more flour as needed to make a cohesive but fairly loose dough, slightly sticky when touched.
Coat a large bowl with cooking spray and transfer the dough to the bowl, covering tightly with wrap. Let rise for another 3 hours. Preheat the oven to 450 degrees with the stone or tiles on the center rack. Be sure to place a heavy skillet on the lower rack at least 10 minutes before baking.
Turn the dough out onto a lightly floured surface and divide into two equal parts. Shape into two baguettes on a piece of parchment paper (doesn't need to be floured) set on a peel or large movable surface (I use a large wood cutting board). Snip the loaves with a pair of scissors about 5 times across the top at an angle, then brush the tops with olive oil and sprinkle on the remaining salt. Let the dough rise until it can rise no more (should feel very light to the gentle touch), about 45 minutes to an hour.
Slide the baguettes and parchment onto the stones, then carefully and quickly pour 1-2 cups of water into the skillet. Close the oven door and keep it closed during baking to preserve the steam. Bake until well-browned, about 25 minutes. Remove to cooling racks.

Enjoy!!


Wednesday, September 27, 2006

Carrot Soup

So, it has been a long time since I blogged. About three months, actually, but there's a good excuse. I'm three months pregnant, and it's only recently that I'm enjoying food again. Not just enjoying it...needing it desperately. I wanted to share one of my favorite recipes - Carrot Soup. Even though soup, for me, is more of a cold-weather favorite, this recipe has all the right flavors to make it seem fresh from the garden in the summer or soothing and warm in the winter. It's so good, just thinking about it makes me want to dash off to the kitchen.

Carrot Soup

4 T. butter
1 small onion, diced
1 lb. carrots, peeled and chopped
1/3 c. white wine
3 c. chicken broth (not a strong stock)
1 t. sugar, if needed
Kosher salt and fresh black pepper to taste

Melt the butter in a medium saucepan. Stir in the onion and sauté with a pinch of salt (to bring out the sugars in the onions) about 5 minutes, until translucent. Stir in the carrots and wine with 1/2 cup of the broth. Bring to a light boil, then cover and cook over low heat for half an hour, stirring occasionally, until the carrots are mashable.
Pour the contents of the saucepan into a blender with 1 cup of broth. If the blender is more than half full, only do half of the soup at a time. Purée carefully, letting steam out as necessary so the top doesn't blow off. Return the soup to the saucepan and heat with remaining ingredients. Test for seasoning and serve.


And now I think I'll go make another batch!

Monday, June 12, 2006

New Lemon Chicken

I really enjoyed tonight's dinner. How very vain of me, I know, but I liked it because I finally made a lemon chicken dish that didn't taste like piccata (not that I don't like piccata - I do) that was good. So, here's what I did. I took 5 chicken breasts and cut them each into 2-3 small portion-size pieces. In a dish, I combined the zest of 1 lemon (using a microplane), the juice of that lemon (about 1/4 cup), a couple sprigs of fresh chopped cilantro (from my garden), about 1/4 cup olive oil, salt, and pepper. I added the chicken, then turned it several times to coat it completely, and let it set about 1/2 an hour - no more. When I was ready to cook it, I heated my pan to medium high, added my olive oil and let it heat, then placed the chicken in the pan in one layer. After about 10 minutes, I turned it and cooked it 5 more minutes. Some of the pieces were pretty thick, which is why it took so long to cook, but they all browned nicely and stayed really tender. I removed the chicken to a dish, then deglazed the pan with about 1/2 cup of white wine (I used a Soft Chenin Blanc, but do whatever you like, since I know nearly nothing about wine). After the wine reduced by half, I added 2 T. butter, 1 T. flour, about 1/4 t. lemon zest, probably 1 cup milk, and around 1 cup of good chicken broth. Salted to taste and served with the chicken. Oooh, yum. The chicken, I'll warn you, has a bit of a bite to it, since it was quite tart on the skinny pieces, but the thicker pieces were just right with the marinade and sauce.

I served it with julienned, roasted carrots, a favorite side of mine. After julienning, lay the carrots on a baking sheet, drizzle with olive oil, sprinkle with salt, and roast at 425°F for about 1/2 an hour. And I cooked up a pound of orzo pasta, then tossed it with about 1/4 cup of olive oil, plenty of salt, fresh pepper, a crushed and chopped clove of garlic, 1/2 cup toasted pine nuts, and 4 oz. fresh baby spinach leaves, stirred in until wilted. It was a really nice summer dinner.

Later, I finished it with a few bites of my new favorite ice cream, Häagen-Dazs Mayan Chocolate. It was a delicious evening!

Sunday, June 11, 2006

Coconut Rice Pudding

So I’ve never been a huge rice pudding fan. In fact, not so much at all. I’m pretty sure it stems from feeling like the texture of tapioca was similar to eating some small amphibian’s eyeballs, and rice pudding didn’t seem to be too far away. My opinion changed instantly when I stepped into this little dessert bar, Pudding on the Rice, in Provo, Utah while visiting my brother. All they do is rice pudding, which sounded odd but interesting, and they do it so well. It’s as good as going out for ice cream, and that is a high compliment coming from me, since I consider ice cream possibly the greatest treat ever. (Crème brûlée is right up there, too, but it's not so very different from ice cream.)

When my brother came to visit me this last week, he obligingly chilled and transported a few flavors from Pudding on the Rice, with my favorite being coconut. I asked Mark, my husband and co-enjoyer-of-food, to try it, knowing full well he wouldn't like it, since he didn't like coconut ever before we were married 9 years ago, and now seems to like it when it's part of a dish, like vegetable curry or something. Eager with anticipation and ready to be deflated with his lack of enthusiasm, he tasted it, then told me he thought he might like it if it didn't have coconut flakes in it. Since I haven't made a coconut dessert for the last 9 years, I jumped on the opportunity. Last night, I made my first-ever rice pudding and Mark's first-ever coconut dessert. I chilled it in the freezer, stirring every few minutes, so we wouldn't have to wait 3 hours to eat it, since we were going to bed after watching King Kong (not a movie I readily recommend). Not only did Mark eat a small dish of it last night, he took a few spoonfuls today and gave me his approval. This is definitely what marriage is all about. Compromise. I like rice pudding; he likes coconut. Shocking!

The pudding was very thick, which was great for me, but if you want it a touch thinner, add a bit more milk. As usual, I combined a few recipes, and this is what I came up with:

Coconut Rice Pudding

1-15 oz. can coconut milk
1½ cups 2% or whole milk
½ cup long-grain white rice (do not rinse)
½ cup sugar
1 tablespoons unsalted butter
1 teaspoon vanilla
pinch salt

Bring milk, rice, sugar, butter, vanilla, and salt to a boil in a heavy saucepan over moderately high heat, then reduce heat to low and simmer, uncovered, stirring frequently, until rice is very tender, about 1 hour. Chill, covered, until completely cool, then serve.

I'd include a picture, but it's rice pudding...not so beautiful. It's good by itself or served with mangoes!


Friday, June 02, 2006

Just to let you know...

Since this is my first-ever blog entry, I better make something clear up front: like most other bloggers, I have no expertise in any field, but I’m full of mediocre information and opinions. That being said, the reason I'm taking this on is because I love to cook, bake, taste, devour, and enjoy food. Amidst all my culinary meandering, I do little to keep track of where I've been. I couldn't tell you what I made for dinner on a regular basis last year, let alone five years ago. Hopefully, this will help me out. And maybe you. And maybe not!

Last night, I wanted to make Ina Garten's roasted baby potatoes, but you're supposed to roast them in butter on the stovetop in one of those beautiful, ceramic dutch ovens that I've always wanted. Luckily, I discovered that my 9-year old cookware was sufficient for the job, since the bottoms of my saucepans and pot are about an inch thick (which, incidentally, is exactly why I bought them). The potatoes only cook about half an hour over medium low heat in butter, fresh pepper, and salt, and then I tossed in some fresh thyme. I snuck one, even though my diet-of-the-day said no potatoes, and they were so delicious. Perfectly cooked, perfectly moist, a little buttery, deliciously seasoned. That's definitely going to be repeated.